


Description:
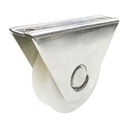
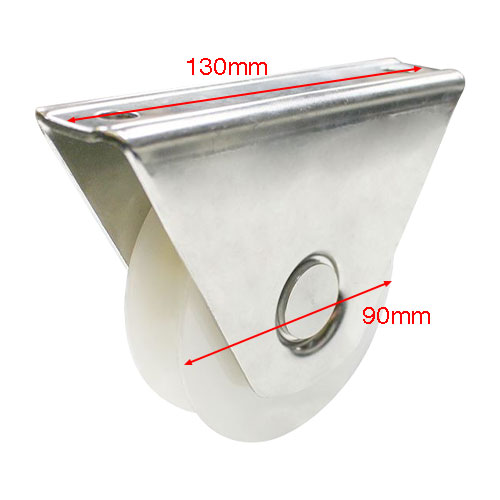
The WH384 Sliding Gate External Wheel Rollers are designed to provide smooth and reliable operation for your sliding gate. These rollers feature a white nylon wheel with a 90mm diameter, which reduces friction and ensures quiet movement. The wheel rollers are mounted on a sturdy stainless steel bracket, offering durability and resistance to corrosion. With their U-groove design, these rollers are suitable for various types of sliding gates. Whether it's for residential or commercial applications, these external wheel rollers deliver excellent performance and ease of use.
Hold weight up to 100kg
Installing a sliding gate wheel involves a few key steps to ensure the gate operates smoothly. Here’s a step-by-step guide to help you install it:
Materials Needed:
- Sliding gate wheel
- Measuring tape
- Drill and drill bits
- Screws and bolts
- Wrench or screwdriver
Steps for Installation:
- Prepare the Gate and Track:
- Before installing the wheels, ensure that your sliding gate is already installed and that the sliding track is properly laid out.
- The track should be level and secure to ensure smooth operation.
- Determine the Wheel Placement:
- Decide where the wheel brackets will go on the gate. Typically, the wheels should be placed at the bottom of the gate. Depending on the gate size.
- The wheel’s placement is important for proper weight distribution and gate stability.
- Mark the Drill Holes:
- Hold the wheel brackets against the gate at the desired position.
- Use a measuring tape to ensure the placement is even and at the correct height.
- Mark the holes where the screws or bolts will go to secure the wheels.
- Drill the Holes:
- Drill holes at the marked points on the gate, making sure the holes are large enough for the screws or bolts provided in your wheel kit.
- If you’re installing a single wheel, the hole placement should be centered along the gate's width.
- Attach the Wheel Bracket:
- Secure the wheel bracket to the gate using the screws or bolts.
- Tighten them properly to ensure the bracket is secure. Be sure the wheel can rotate freely once attached.
- Install the Wheel:
- If the wheel is separate from the bracket, slide the wheel into its bracket or mounting system.
- Tighten any screws or bolts holding the wheel in place, ensuring it rotates easily and is properly aligned.
- Test the Gate:
- Test the sliding gate by moving it along the track.
- Check that the wheels glide smoothly without any obstruction or resistance. The gate should be stable and move freely.
- Adjust if Necessary:
- If the gate isn’t sliding smoothly, check the alignment of the wheels and track. You might need to adjust the wheel height or ensure that the track is level.
- Make sure the wheels are aligned with the gate and track to avoid any friction.
Try not to weld them onto the sliding gate frame it will be a nightmare to replace them later